


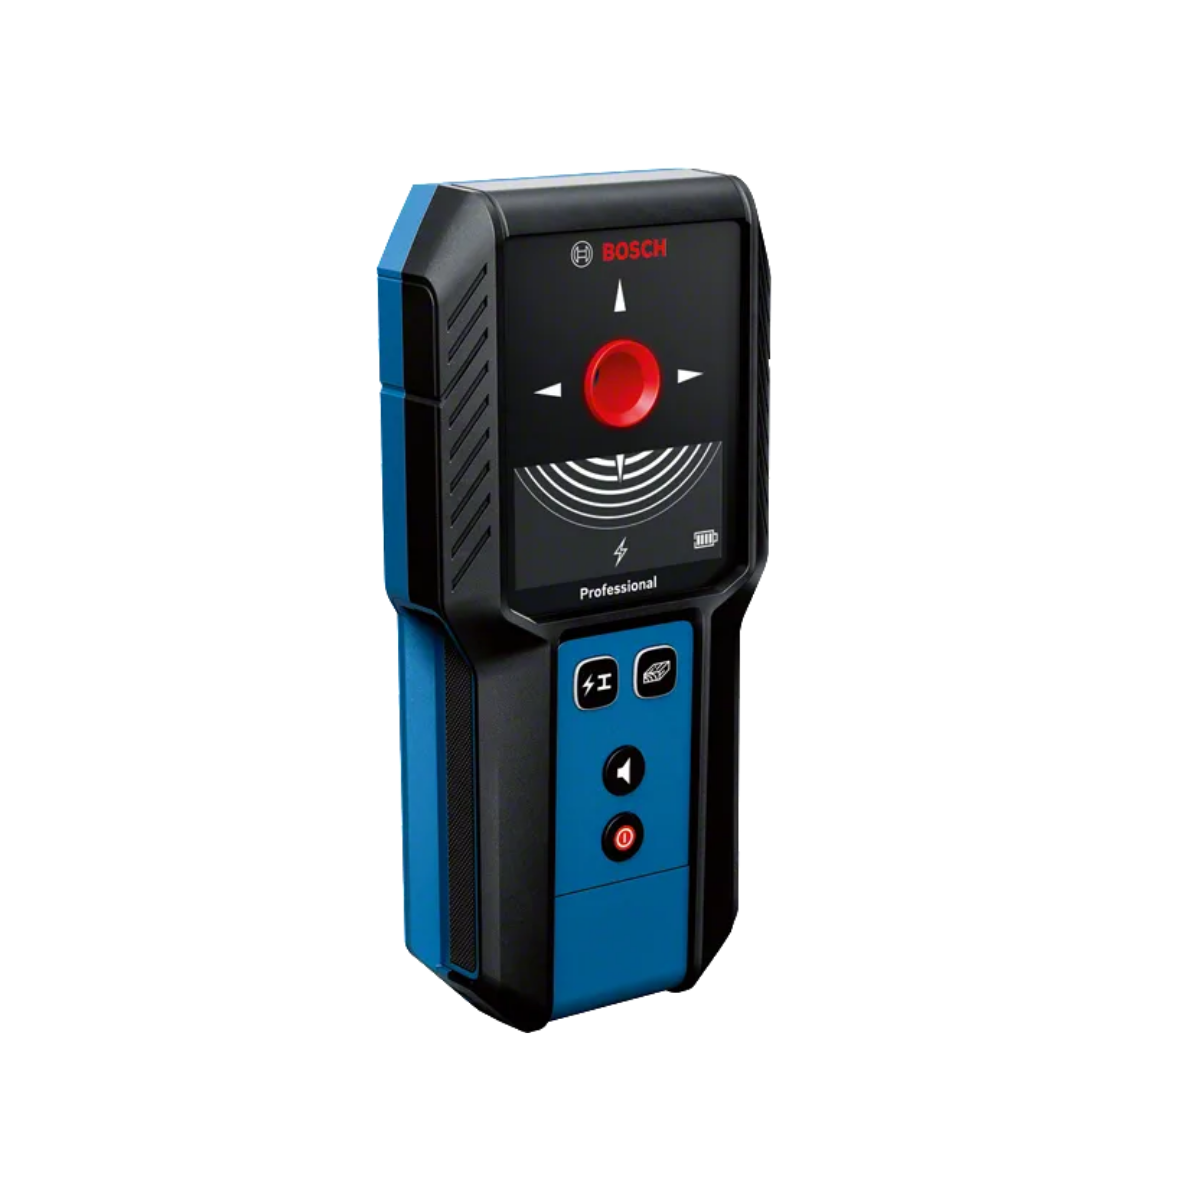
Bosch GMS 120-27 Professional Wall Scanner Dectector
Bosch Professional Detector GMS 120-27 - Clear and simple: the intuitive wall scanner that makes the invisible visible
- Gives you confidence by detecting metal, live wires, and wooden studs behind the wall
- Easy to use with simple mode selection and marking hole
- Built for operation on tough job sites thanks to shock-absorbing rubber casing and IP54
Additional data
Dust and splash protection: IP 54 Bosch Radar Technology: no Max. detection depth: 120 mm Detectable objects: magnetic metals (e.g. iron), non-magnetic metals (e.g. copper), live cables, wooden substructures Detection depth, magnetic metal, max.: 100 mm Detection depth, non-magnetic metal, max.: 120 mm Detection depth, live cables, max.: 50 mm Detection depth, wooden substructures, max.: 30 mm Material identification: Magnetic metal, Non-magnetic metal, Live cable, Non-metal material Power supply: 2 x 1.5 V LR6 (AA), 2 x 1.2 V HR6 (AA), 1 x BA 3.7V 1.0Ah Li-Ion battery Weight, approx.: 0.29 kg Additional function: Marking hole
Product Highlights
When you’re drilling into a wall, you want to get the job done, confident that you won’t hit an obstruction. Our GMS 120-27 Professional wall scanner allows uncomplicated and intuitive detection of objects. Detection results appear via signal indication on the display and the colour-coded marking hole. The easy-to-use detector offers simple mode selection, and you can mark exactly through the marking hole where objects have been detected. The robust GMS 120-27 was developed for tough job sites with IP54 dust and splash water protection, plus a shock-absorbing rubber casing.
Equipment & Application
Our GMS 120-27 Professional wall scanner helps you detect and locate metals, live wires, and wooden studs in dry walls. Locating objects in walls before drilling provides increased safety on the job, especially for craftspeople doing renovation work when fitting cabinets, kitchen counters, washbasins, boilers, and heating systems, or installing A/C and sprinkler systems.
Additional Information
Not only does this scanner identify the center of the detected object, it also indicates its material characteristics such as whether the object is magnetic or non-magnetic metal, a live wire, or non-metallic. Our GMS 120-27 Professional wall scanner helps you detect and locate metals, live wires, and wooden studs in dry walls. Locating objects in walls before drilling provides increased safety on the job, especially for craftspeople doing renovation work when fitting cabinets, kitchen counters, washbasins, boilers, and heating systems, or installing A/C and sprinkler systems
Technical Data
1. Which objects can be detected?
a. The GMS 120-27 detects magnetic metals (e.g. iron), non-magnetic metals (e.g. copper), live wires (50-60Hz) and wooden studs
2. What is the max. detection depth?
Max. detection depth
Non-ferrous metals (copper) 120 mm
Ferrous metals 100 mm
Live wires 100–230 V (with voltage applied) 50 mm
Wooden beams in dry walls 30 mm
3. Which of the mode buttons shall I choose for my detection?
a. The detector will always automatically find live wires and metals. There is no need to choose this setting, as this is always on (indicated by lit-up button)
b. In case you also want to detect wooden studs behind drywall, you can push the wood button, then wooden studs are also detected additionally. If the wood button is selected, the button is also lit-up.
c. Only switch on the wood detection function for searching in dry walls with a wooden substructure. On other surfaces, the measurement result may be impaired.
4. How long is the battery run time?
Operating time, approx.
With lithium-ion battery pack 5 h
With non-rechargeable batteries (alkaline manganese) 6 h
With rechargeable batteries (NiMH) 7 h
Working with the GMS 120-27
1. Which steps do I have to follow when detecting with the GMS 120-27?
a. Remove jewelry and gloves. Electronic devices nearby must be switched off.
b. Hold the tool on the grip area (do not touch area above, as this will affect the detecting sensors)
c. Place the GMS 120-27 directly on the wall
d. Only for concrete walls: move the GMS 120-27 in a circle, before proceeding with the next step. This will ensure best performance on rebar meshes.
e. Move tool in a straight line over the wall
f. To get the most precise location of a detected object, move over the object just until LED ring lights up green, then move back again to find center of the object
g. If the course of the detected object (e.g. pipe, live cable) is not known, perform a cross wise measurement: detect from left to right, then lift up and start a new measurment detecting up and down. Like this, you make sure that the object is crossed, and therefore detected.
2. How do I find the center of an object?
a. When the GMS 120-27 is moved over an object, the signal rings build up (=more signal rings, stronger object signal) and the 4 arrow indicators light up once a first rough center is detected.
b. To locate the precise centre, move the tool over the object just until the LED light turns green again, then move back over the detected object. c. Doing this, the GMS 120-27 can collect more information about the object and locate it more accurately.
3. What do the signal rings mean?
a. The signal rings refer to the object signal the GMS 120-27 detects. The more the rings build up, the stronger the signal is.
b. A strong signal is caused by the proximity of the object and/or by certain object types (e.g. metal objects generally generate a stronger signal than wooden studs).
4. Where do I see what kind of object is being detected?
a. You can see which objects are generally being looked at for by the highlighted button.
b. If the button that shows live wires and metal is always lit-up, that means the detector is automatically detecting these. If you want to look for wooden substructures, you can press the wood button which will light up if it has been detected.
c. If an object is detected and you want to know what the material is mad eof, you will see its indication on the display.
5. How can I mark a detected object?
a. You can simply take a pen and mark through the marking hole. The marking hole directly represents the center of the current detection. If you want to proceed with the detection after marking through the marking hole, lift the tool from the wall and place it again, to start a new measurement.
b. You can also mark a detected object by using the upper and side marking aids (recessed area if you prolong the center indicators)
6. What do I have to consider when looking for live wires? (live, Hz, sometimes metal, moisture level/humidity, …)
a. The cable must be live. Switch on the electricity consumers to ensure that the electricity cable is live.
b. The 50–60 Hz signal from the electricity cable must be able to reach the measuring tool. If the cable is in damp walls (e.g. > 50 % humidity), behind metallic foil (e.g. thermal insulation) or in an empty metal pipe, the signal will not reach the measuring tool and you will not be able to find the cable.
c. The measuring tool must be sufficiently earthed. To do this, hold it firmly (without gloves) by the gripping surface. Make sure that you are in good contact with the floor. Insulating shoes, ladders or platforms may compromise your contact with the floor. The floor must also be earthed in order for live cables to be detected.
d. The 50–60 Hz signal from the electricity cable must be stronger along the cable than in its immediate vicinity. If the wall is very damp or poorly earthed, the signal will be the same strength throughout the wall. This will result in the measuring tool indicating that it has found a signal over a large area, but it will not be able to detect the exact location of the cable. In this instance, it may be helpful to place your free hand on the wall 20–30 cm from the measuring tool in order to conduct the signal away from the wall.However, you should not change the position of your free hand during the measuring process.
e. Multi-phase (known as three-phase current or heavy current) electricity cables cannot be detected as live cables because the signals from the different phases cancel each other out. You can, however, detect multi-phase electricity cables at shallow depths as metal objects.
f. Conductive wall surfaces, such as certain tiles, may result in electricity cables no longer being indicated or the light-up ring lighting up red over a large area. g. Flat lying electricity cables (up to max. 2–3 cm in depth) may also be indicated as metal objects. However, this does not apply to solid-wire cables. Switch off power consumers and make sure that live cables are de-energised before drilling, sawing or milling into walls, ceilings or floors. After performing any kind of work, check to ensure that objects placed on the substrate are not live.
7. What do I have to consider when looking for wooden studs?
a. First, press the wood button, so that wooden studs can be deteced.
b. When the wood detection function is switched on, other objects, such as water-filled plastic pipes, power cables or gas lines, may be indicated as non-metallic objects in certain circumstances. Before drilling, sawing or milling, use other sources of information to check that the object found is actually a wooden beam and not another object (e.g. a plastic pipe, power cable, gas line).
c. Wooden studs usually come with a standard distance between each other (~60cm, depending on your country). This might help you in reassuring that the detected non-metal object is a wooden stud.
d. Nails and screws in the base material may result in wooden beams being identified as metal objects.
8. Notes on reinforcing steel
a. When working on a wall that contains a rebar grid, place the GMS 120-27 on the wall, and move it in a circle, before starting your measurement in a straight line. Like this, the tool will know it is detecting on a rebar grid and adjusts the detection measures accordingly.
9. Do I have to calibrate the GMS 120-27? a. No, the GMS 120-27 comes with a factory calibration and does not need to be calibrated manually.
Errors - Causes and Corrective Measures
1. My GMS 120-27 does not start, what should I do?
a. Please check if the batteries are charged and inserted in the tool correctly
b. If you still face problem turning on your GMS 120-27, please contact customer service www.bosch-pt.com/serviceaddresses
2. The temperature monitoring and warning indicator light up, what can I do?
a. The measuring tool is outside of the operating temperature range, or has been subjected to large fluctuations in temperature.
Switch the measuring tool off and allow it to adjust to the ambient temperature before switching it back on.
It is only possible to take exact measurements if the temperature inside the measuring tool remains constant.
3. The radio interference and warning indicator light up, what can I do?
a. Measurements are impaired by electric, magnetic or electromagnetic fields (such as mobile phones, laptops or tablets near the measuring tool).
If possible, deactivate all tools whose radiation could interfere with the measurement and switch off the corresponding functions or tools.
4. The warning indicator flashes, what shall I do?
a. The measuring tool has developed a fault and is no longer functional.
b. Send the measuring tool to an authorised Bosch after-sales service centre: www.bosch-pt.com/serviceaddresses
5. My tool shows continuously high amplitude in the measuring indicator and the metal object indicator is on, even though there is no metal object near the measuring tool. What shall I do?
The factory calibration is no longer valid (e.g. if the measuring tool falls from great height).
Manually recalibrate the measuring tool
Ensure that the battery charge indicator (d) still shows a capacity of at least 1/3.
Switch the measuring tool off.
Remove all objects near the measuring tool that could be detected (including watches or metal rings).
Hold the measuring tool up horizontally so that the rear side of the measuring tool is pointing towards the floor.
To switch to calibration mode, simultaneously press the on/off button (7) and the audio signal button (6).
Press and hold both buttons (for approx. 5–10 s) until the lightup ring (1) flashes red.
To start recalibration, press and hold the audio signal button (6) (for approx. 5−10 s) until the light-up ring (1) lights up red.
If the calibration was successful, the measuring tool will start automatically after a few seconds and will be ready for operation again.
Note: If the measuring tool does not start automatically, repeat the recalibration.
If the measuring tool does not start, send it to an authorised Bosch after-sales service centre.
6. The light-up ring does not light up when the tool is positioned on the wall surface, what shall I do?
a. There are two possible reasons behind this:
b. 1)The surface cannot be detected because the sensor area (17) is dirty. Clean the measuring tool with a soft, dry cloth and re-start the measurement.
c. 2) Contact with the wall or surface may not be detected due to particular wall properties (e.g. a very dark surface).
Position the measuring tool on the surface. For manual wall detection, press and hold the metal/ electricity (4) and wood (5) buttons simultaneously until the light-up ring (1) is lit (for approx. 3 s) and an audio signal sounds. Then perform a measurement as usual.
Note: Before taking the next measurement on a different surface, you must reset the manual wall detection. To do this, switch the measuring tool off and on again.


